Saturday, September 23, 2017

Mediterranean Quinoa Salad


Mediterranean Quinoa Salad

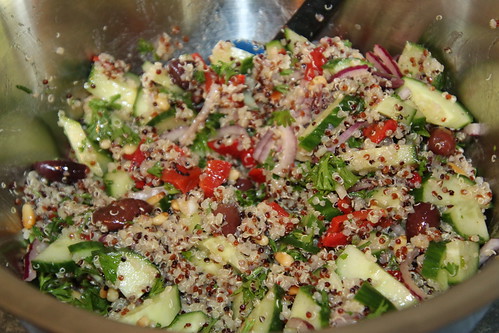
I have had a long-standing desire to eat healthier and mix up more vegetarian meals into the mix.  One of the best options in this environment is quinoa, a great hi-protein grain that is part of a great vegetarian diet.  I have played with a few recipes including this one for what I called Summer Quinoa Salad a few years ago.  I wanted to play with it a bit to get rid of the tomatoes for the Mrs. and add in some other flavors.  I made this the first time and it came out great.  I loved adding in the roasted red peppers and kalamata olives. These are nice parts of the Mediterranean diet - so that is how this recipe got its name. Even the Mrs. loved it!  While it does have a good deal of protein per serving (sorry I did not figure that out), but as made, the salad has around 211 calories per cup.  That might seem lot a bit much. but quinoa adds protein and calories to the mix.  Serve it on a bed of spinach for a more filling lunch or side.

Ingredients (Serves 8-10):
1 cup Quinoa (white or tri-colored)
1/2 cup Pine nuts
1/3 cup Olive oil
4 tbsp Lemon juice
1 tbsp Dijon mustard
1/2 tsp Kosher salt (adjust to taste)
1/2 tsp Black pepper (adjust to taste)
1 Cucumber, peeled and finely diced (if using a seedless cuke - leave the peel on)
2 Roasted red peppers, diced
14-16 Kalamata olives, chopped
1 small or 1/2 medium Red onion, finely chopped
1/4 cup Parsley (fresh), chopped

Directions
1. Rinse quinoa under running water to make sure it is clean.
2. Bring 2 cups water to a boil. Add quinoa, cover, and reduce heat to medium-low. Simmer for around 15-20 minutes or until the water is absorbed. Remove pot from heat and let cool in a large mixing bowl.
3. In a small saute pan over medium-low heat, toast the pine nuts (shaking the pan often so they do not burn) for around 3-5 minutes until lightly browned. Add pine nuts to the mixing bowl with the quinoa.
4. In a small bowl, add olive oil, lemon juice, Dijon mustard, kosher salt and black pepper. Mix thoroughly with a whisk.
5. In the large mixing bowl (with the quinoa and pine nuts), add diced cucumber, roasted red peppers, Kalamata olives, red onion, and parsley. Add olive oil mix and thoroughly blend the salad.

Enjoy as a side or as an entree with a bed of spinach or greens.

Monday, September 18, 2017

Baked Apple Pie Rolls


Baked Apple Pie Rolls

Well...this is amazing!  I found this recipe for Fried Apple Pie Rolls from Eating Well and it looked too good NOT to make.  I am not someone that has made apple pies at home - but since it is harvest season and there are apples everywhere.  I love this recipe because it is relatively low calories for a baked good.  Following one of the comments under the recipe who suggested baking it instead of frying it, I thought I would give it a shot.  I played with the recipe, lowered the sugar a bit and I have to figure this new version is probably around 170-180 calories each (the original was around 207 calories).  That is just an estimate - but it is good enough for me.  These tasted great.  I might need to put in a little less filling or spread it over to a 9th pie roll.  We heated them up in the microwave for around 15-20 seconds to give it a bit of warmth before eating.  I am sure they would be great with ice cream - but we are trying to watch calories!

Ingredients (makes 8 pie rolls)
2 tbsp Butter
4 Apples, peeled & diced (I used granny smith and honeycrisp apples)
2 tbsp & 4 tsp Sugar, divided
1 3/4 tsp Cinnamon, divided
1/4 tsp Ground nutmeg
1/4 tsp Kosher or sea salt
1 tbsp All-purpose flour
2 tsp Lemon juice
8 egg roll wrappers
Olive oil spray

Directions

1. Preheat oven to 425 degrees.
2. Heat butter in a large skillet over medium-high heat until melted.
3. Add diced apples, 2 tbsp & 3 tsp sugar, 1 1/2 tsp cinnamon, nutmeg and Kosher salt. Mix thoroughly and cook, stirring occasionally, until the apples are softened, 8-9 minutes.
4. Add flour and cook 1 minute longer. Remove from heat and stir in lemon juice.
5. Place a piece of parchment paper on a baking sheet - and lightly spray with olive oil.
6. Place an egg roll wrapper on a clean work surface with one corner facing you. Brush the edges of the egg roll wrapper with water. Place around 1/3 cup of the apple filling in the center of the wrapper. Take the corner facing you and fold it over the filling.  Then fold both sides of the wrapper over the filling, then roll up as tightly as possible. Place on the prepared baking sheet.  Repeat with the remaining wrappers and filling.
7. Lightly spray the top of the pie rolls.  Combine remaining 1 tsp of sugar and 1/4 tsp of cinnamon and sprinkle on top of the pie rolls.
8. Bake for 15 minutes.  Turn over and bake for 10 more minutes.

Enjoy!

Monday, September 4, 2017

Avocado Egg Salad


Avocado Egg Salad

So I have been really working on losing weight and eating better.  One of my favorite comfort foods is egg salad - but it can be really bad when you get it in a restaurant.  I have my recipe that I shared a bunch of years ago, but I saw a recipe that looked intriguing.  I had seen a number of recipes for pulling an avocado into egg salad (including this one) as a way to reduce mayo and get some healthy fats in your diet.  So I took a few recipes and played with it a bit.  This is my first attempt and I really like it.  It makes around five 1/2 cup servings and they clock in at around 164 calories.  Avocado gives you alot of calories, but it gives you lots and lots of nutrients.  Ditto on the Chia seeds.  So it is a good trade-off.  Anyway, I love the way this came out and will be a great lunch and snack.

Ingredients (five 1/2 cup servings at 164 calories each)
1 medium avocado, pitted and peeled
5 Eggs, hard boiled, peeled and chopped
2 Celery stalks, finely chopped
1 tbsp Mayonnaise (olive oil or light)
1 tsp Lemon juice
1 tbsp Diced onions (dried)
2 tsp Chia seeds
1 tsp Parsley (dried)
1/2 tsp Kosher salt
1/2 tsp Cumin
1/2 tsp Celery seed
1/4 tsp Black pepper

Directions

1. Mash avocado with a fork in a medium bowl.
2. Add remaining ingredients (eggs through pepper) and mix thoroughly until blended.

Enjoy!  You may need to add a bit of mayonnaise if it gets dried out.

Sunday, July 9, 2017

Flounder and Sauteed Mushrooms


Flounder and Sauteed Mushrooms

This is a new dish that I developed from a variation of one of our favorites, sauteed mushrooms (as inspired by Agostino's Ristorante Italiano (or Agostino's By The Sea) in Capistrano Beach, California.  We want to eat more fish, and it dawned on me that this was a good way to do it.  The fish came out very tender and flavorful.  I believe that you can use virtually white fish here, say tilapia or whitefish (you may want to adjust the cooking time for thickness).  We had flounder.  Even though it was a bit freezer burned - but it came out great!  As a kid growing up in New Jersey, flounder was our everyday fish.  Things are definitely not that way in the Midwest.

I do not have the calories figured out - or even estimated, but I have to figure this is a pretty good meal for a low-calorie dining plan.  While you can serve this beautifully with a baguette, having a green vegetable to go with this would also be great.  It is a very nice way to prepare fish that is very different that what we normally do at home.  And it came out great.

Ingredients (serves 2)
2 tbsp Olive oil
1 tbsp Butter
2 oz can Anchovies (with most of the oil drained)
2 cloves (or tsp) Chopped garlic
1 Shallot (small), chopped
1 tbsp Parsley, dried
1/2 tsp Kosher salt (adjust to taste)
1/4 tsp Black pepper (adjust to taste)
16 oz White mushrooms, stems trimmed and larger ones halved
1/2 cup Chicken or vegetable broth
1/2 cup Sherry or cooking sherry
2 Flounder fillets (or other thinner white fish such as haddock or tilapia)

Directions
1. Heat oil and butter over medium-high heat for 1-2 minutes (or until the butter is melted).
2. Add anchovies, garlic, shallot, parsley Kosher salt and black pepper.  Saute for 2-3 minutes, breaking up the anchovies.
3. Add mushrooms and saute until they are blended with the anchovies-garlic mixture.
4. Add the broth and sherry.  Saute for 5-7 minutes.
5. Using a slotted spoon, remove the mushrooms from the pan (leaving as much liquid as possible in the pan).  Put a piece of foil over the mushrooms to keep warm in a serving bowl.
6. Place the flounder in the pan.  Cover and cook for 5-6 minutes.
7. Lower the heat to medium and add the mushrooms back to the pan.  Cook uncovered for around 2-3 minutes.

Enjoy!

Saturday, July 8, 2017

Mushroom and Sausage Mini-quiches


Mushroom and Sausage Mini-quiches

We have made these a few times and they are wonderful!  I adapted this recipe from Eating Well (one of my favorite sites).  We added more sausage to match with the package sizes we can easily get here.  These have (I think) around 150 calories and lots of protein.  We have one or two for breakfast or lunch - they reheat very easily - around 30-40 seconds for one and 60 seconds for two.  This recipe makes 12 mini-quiches (a full muffin pan's worth) and they are pretty sturdy.  These are great to have on hand for a quick breakfast or snack!

Ingredients (makes 12 mini-quiches)

12 oz Turkey breakfast sausage (removed from casing and crumbled into small pieces)
2 tsp Olive oil
8 oz Mushrooms, thinly sliced
1/4 cup Swiss cheese, finely shredded
1/2 tsp Kosher salt
1/2 tsp Black pepper
6 Eggs
1 cup Skim milk

Directions
1. Preheat oven to 325°F. Coat a nonstick muffin tin generously with cooking spray.
2. Heat a large nonstick skillet over medium-high heat. Add sausage and cook until golden brown, breaking it up as it cooks, 6 to 8 minutes. Transfer to a bowl to cool. 
3. Add olive oil to the pan. Add mushrooms and cook, stirring often, until golden brown, 5 to 7 minutes. Transfer mushrooms to the bowl with the sausage. Let cool for 5-7 minutes. Stir in Swiss cheese, Kosher salt and black pepper.
4. Whisk eggs and milk in a medium bowl. Divide the egg mixture evenly among the prepared muffin cups (to around 2/3 of the height of the muffin cup). Spoon in a heaping tablespoon of the sausage and mushroom mixture into each cup. 
5. Bake in oven for around 27-29 minutes, or until tops are just beginning to brown.  Let cool on a wire rack for 5 minutes. The easy way to get the mini-quiches out is to flip the pan over a rimmed baking sheet and they should pop right out.

Enjoy!


Sunday, May 7, 2017

Corey's Sheet-Pan Chicken Fajitas


Corey's Sheet-Pan Chicken Fajitas

As family lore goes, the very first meal I made my wife while we were still dating was steak fajitas.  Well, to put it more to the point, it was an attempt at making steak fajitas - a very poor attempt. (Cooking note - beef stew pieces do not belong in a fajita...ever).  Luckily for me, she did not break up with me on the spot.  Needless to say, I have gotten much better in the nearly 30 years since the steak fajita incident.  Which brings me to this new recipe for sheet-pan chicken fajitas.  I found this recipe on the excellent Eating Well site and adapted it to make it a bit less spicy and more to our tastes.  I love Mexican food and this recipe recently made it into the magazine.  And wow - this just came out fantastic.  This will be a new favorite for sure.  I think this would be great with either tortillas or over rice.  This will get into the regular rotation for sure.  And you make it all in a sheet-pan, so cleanup is a breeze!

Ingredients (serves 3-4)

Cooking spray
2 Red bell pepper, sliced (use any color)
8 oz Mushrooms, stems removed and sliced to 1/4" thickness
1 - 1 1/2 cups Red onion, chopped into 1/2" pieces
1 pound Chicken breast (boneless and skinless)
2 tbsp Olive oil
2 tsp Chili powder
2 tsp Cumin, ground
1 tsp Garlic powder
1 tsp Onion powder
1 tsp Kosher salt
1/2 tsp Black pepper
1 tbsp Lime juice
8 Tortillas (if desired)

Directions

1. Preheat oven to 400°F. Coat a large rimmed baking sheet with cooking spray.
2. Place the cut bell peppers, mushrooms, and onions in a large mixing bowl.
3. Cut chicken breasts in half horizontally, then slice crosswise into thin strips. Then place the chicken on top of the vegetables.
4. Add olive oil, chili powder, cumin, garlic powder, onion powder, Kosher salt and black pepper to the mixing bowl.  Blend thoroughly and spread in an even layer on the rimmed baking sheet.
5. Roast on the middle rack for 16-18 minutes. Leave the pan there and turn the broiler to high. Broil for an additional 6-7 minutes.
6. Remove from oven and use a slotted spoon to move fajitas to a serving bowl. Stir in lime juice.

Enjoy with tortillas or over rice!

Friday, March 17, 2017

Spring Pasta


Spring Pasta

Every so often, I come across a recipe that I really love.  I was thinking of an easy recipe to make on Friday night.  The impetus for cooking this was the ingredients that I have at home  - basically shrimp, asparagus and mushrooms.  I added a few of my favorites, including anchovies and it was a perfect dinner!  I loved the way this turned out.  This is based on the recipe for Asparagus, Shrimp and Mushroom Pasta from Sarah Walker Caron. This looks like a great site and I will go back there again. I love the idea of cooking the shrimp and veggies in the oven for a pasta dish. Will definitely play with this again. This is a winner!

Ingredients (Serves 4-5)
  • 13-15 oz box, Pasta (reserve 1/2 cup of pasta water)
  • 1 lb Shrimp (large 15-25 count per pound), peeled
  • 1 lb Asparagus, cut into 2" slices (top only is fine)
  • 12 oz Mushrooms, sliced thick
  • 4 tsp Garlic, chopped (or 4 cloves)
  • 1/2 tsp Oregano (dried)
  • 1/2 tsp Kosher salt
  • 1/4 tsp Basil (dried)
  • 1/4 tsp Black pepper cloves garlic, crushed
  • 2 tbsp Olive oil (and oil spray)
  • 2oz can Anchovies (much of the oil drained and coarsely chopped)
  • 1 tsp Lemon juice
  • Shredded Parmesan cheese, to taste

Directions
  1. Preheat the oven to 400 degrees.
  2. Cook pasta as directed.
  3. Spray a jelly roll sheet or lipped baking sheet with with a light coating of olive oil.
  4. Add the shrimp to the pan and top with cut asparagus and mushrooms.  Add garlic, oregano, Kosher salt, basil, black pepper and olive oil.  Lightly stir to combine.
  5. Put baking sheet in oven for 10 minutes. Add chopped anchovies and stir gently. Return to the oven and bake for an additional 7-9 minutes
  6. Combine the cooked pasta with the veggies and shrimp.  Add 1 tsp lemon juice and toss well to combine. You can add the pasta water (if desired - the mushrooms can generate a lot of liquid) and toss again.
  7. Sprinkle Parmesan cheese on the pasta and serve.


Enjoy!

Tuesday, February 7, 2017

Mexican Chicken and Rice


Mexican Chicken and Rice

So I stumbled across a recipe that I wanted to try.  I love coming up with recipes that can take advantage of things that you might already have in your pantry and your freezer - and I think this is a good option!  I found on food.com a recipe for Spanish Chicken & Rice Bake.  I made a few tweaks to see if I can make it more pantry friendly.  It was super easy to prepare and very tasty.  The chicken came out fantastic!  We will definitely make this again.

Ingredients (Serves 3-4)

1 can Cream of chicken soup (10.5 oz)
1 can Petite diced tomatoes (14.5 oz), with liquid
1 cup Chicken (or vegetable) broth
1 can Whole kernel corn (15 oz) , drained
1 can Chopped black olives (4.25 oz)
3/4 cup Long-grain white rice, uncooked
1/2 tsp Cumin
1/2 tsp Oregano
1/4 tsp Garlic powder
3 Chicken breast halves (boneless and cut in half)
1/2 tsp Kosher salt
1/4 tsp Black pepper
1/4 tsp Chili powder (adjust to taste)
1/4 cup Shredded cheddar cheese (adjust to taste)

Directions

1. Preheat oven to 375°F
2. In a casserole dish (with a cover), mix cream of chicken soup, tomatoes, chicken broth, corn, black olives, rice, cumin, oregano and garlic powder.
3. Top soup mixture with chicken.  Season with Kosher salt, black pepper and chili powder.
4. Cover tightly with casserole lid or foil.  Bake at 375°F for 50-55 minutes.
5. Sprinkle with cheese over the chicken, cover with lid and let set for 2-3 minutes.

Enjoy!

Monday, January 16, 2017

Mediterranean Chicken With Tomatoes and Capers


Mediterranean Chicken With Tomatoes and Capers

One of my favorite recipe sites is the wonderful Cooking with the New York Times.  I have seen their recipe for a while for Chicken Breasts With Tomatoes and Capers and have wanted to make this.  This just looked like a great and healthy option when you are looking for something great to cook in a hurry.  The best part is that you can make most of this with freezer and pantry staples, so it can come together quickly and without a ton of prep. It is also very easy to pull together.  The chicken comes out super moist (and tasty).

Ingredients (serves 4)

4 Chicken breasts (boneless & skinless)
1/2 tsp Kosher salt (adjust to taste)
1/4 tsp Black pepper (adjust to taste)
2 tbsp Olive oil
2 tbsp Butter
1 Shallot, finely chopped
3 tsp Garlic, finely chopped
1 tsp Tarragon, dried
1 tsp Oregano, dried
14.5 oz can Petite diced tomatoes
1/4 cup Red wine vinegar
1/4 cup Capers, drained
1 cup Dry white wine (or cooking wine)
1 tbsp Tomato paste

Directions

1. Sprinkle chicken with Kosher salt and black pepper.
2. Heat the olive oil and butter in a large skillet. Add the chicken breasts and saute over medium-high heat, turning the pieces after 4 minutes and cook for another 3 minutes.
3. Add the shallots and garlic to the pan and cook for an additional minute.
4. Add tarragon, oregano, tomatoes (with liquid), vinegar, capers, wine and tomato paste. Bring to a boil as you stir to dissolve the brown particles on the bottom of the skillet.
5. Cover and lower to medium.  Simmer for 9-11 minutes.

Enjoy with rice!

Sunday, January 15, 2017

Pilgrim Chili


Pilgrim Chili

This is a recipe I made a few months ago and have been carrying around for a long time! I wanted to make a quick vegetarian stew and loved the way this turned out. This recipe was adapted from the Pulse Pledge's Northwest Chili. This is a cool site that promotes eating pulses (things like chickpeas, lentils, peas & beans).  I loved this as a lunch meal, especially since it reheats great in the microwave.  You can also add hot sauce if you want more of a bite!  And about the name - I have no idea why I called it that.  I first made it in July, so it was not even near Thanksgiving!  However, it might be a nice dish to have for vegetarian diners on that holiday.

Ingredients (4-6 servings)

2 tbsp Olive oil
2 small Onions, chopped (or one medium)
3 tsp Garlic, minced (or cloves)
1 Bell pepper (red or green), chopped
1 1/4 cup  Lentils (dry), rinsed
2 cups Peas and carrots (frozen)
1  tbsp Chili powder
2 tsp Cumin
2 tsp Cinnamon
1 tsp Kosher salt
1/2 tsp Black pepper
2 1/2 cups Broth (Vegetable or Chicken)
28 oz can Tomatoes (petite diced), drain much of the liquid (but not all)
15 oz can Chickpeas (garbanzo beans), drained

Instructions

1. In a large pot, heat the oil over medium-high heat.  Add the onion, garlic & bell pepper and saute for 3-5  minutes. Add lentils, and stir to coat them with oil.
2. Add frozen peas and carrots, chili powder, cumin, cinnamon, Kosher salt, black pepper, and broth.  Bring to a boil. Reduce heat, cover, and simmer about 25-30 minutes.
3. Add tomatoes and chickpeas.  Mix thoroughly and simmer for another 15 minutes.

Enjoy!