Showing posts with label Main Dish. Show all posts

Sunday, January 29, 2023

Long-Life Noodles with Chicken and Broccoli

 Long-Life Noodles with Chicken and Broccoli


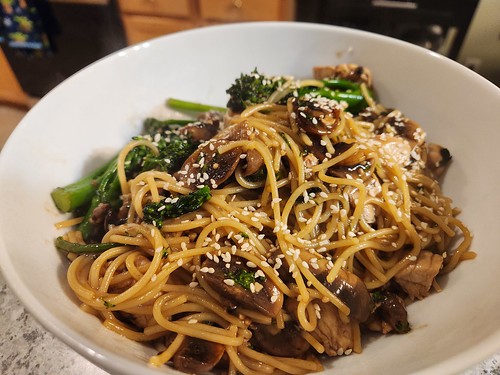
I wanted to start mixing up my dishes for the new year.  We love a Chinese noodle dish and I found this late last year.  What a great way to start the new year with Long-Life Noodles, a recipe I found on the EatingWell site.  We changed the protein to chicken and tweaked a few things and loved the way it came out.  We think this is going to be a regular!

Ingredients (3-4 servings)

  • 6-8 oz Thin spaghetti
  • 1 tsp Sesame oil
  • 3 tbsp Oyster sauce
  • 3 tbsp Cooking sherry
  • 2 tbsp Soy sauce
  • 1 ½ tsp Cornstarch
  • 1 tbsp Vegetable oil
  • 10-12 oz Broccolini, stalks trimmed with larger pieces cut in half.  
  • 12 oz Mushrooms, sliced thinly
  • 2 Chicken breasts, trimmed and thinly sliced.  
  • 2 tsp Garlic, chopped (or cloves)
  • 1-2 tsp Sesame seeds

Directions
  1. Cook thin spaghetti according to package directions. Rinse and drain well. Toss with sesame oil. Set aside.
  2. Whisk together oyster sauce, cooking sherry, soy sauce, and cornstarch in a small bowl.
  3. Heat a large flat-bottom wok or large pan over medium-high heat. Add vegetable oil and swirl to coat. Add broccoli and mushrooms; cook, stirring occasionally, for 2 minutes. Add chicken and garlic.  Saute for 4 minutes, stirring continually.
  4. Add the sauce and bring to a boil; cook for 1-2 more minutes. Add the noodles to the pan and toss to coat. 
  5. Sprinkle with sesame seeds.  
Enjoy!

Saturday, December 31, 2022

Tortilla Espanola (also Tortilla Espagnola or Tortilla de patatas)


Tortilla Espanola (also Tortilla Espagnola or Tortilla de patatas)

I have not made this dish in a long time.  I modified my recipe a bit from when I first wrote this down nearly 20 years ago.  We will definitely make this again before too long. Once you get the hang of this dish, it will be very easy to make and something that will be welcome for any meal! This dish is basically a Spanish potato omelet. I have heard that the word "Tortilla" in this dish comes from its circular shape, but it could also come from the fact that it will end up "cake" like. If you called this "Fred", it would still taste great.

Ingredients:

3-4 tablespoons Vegetable oil
4-5 medium white potatoes, peeled and thinly sliced (around 1/8" thick with a mandolin)
1 medium onion (yellow or vidalia), thinly sliced (around 1/8" thick with a mandolin)
Kosher salt and black pepper, to taste
6 Eggs
Cooking spray (if needed)

Directions
1. In a large pan, heat 2 tablespoons of vegetable oil over medium heat. Add potatoes and onions and stir every few minutes. Add salt and pepper to taste. The potatoes should cook for around 15-18 minutes. The potatoes and onion should brown in the process.  Lower the heat to prevent it from burning.  
2. In a large bowl, beat 6 eggs and add salt and pepper to taste. When potato and onion mixture is finished, add to the bowl with the eggs. Mix thoroughly.
3. Add one tablespoon oil to a skillet over medium heat (it can be the same used in step number 1. The ideal skillet for this step will have curved sides). Let heat up and then add the potato/onion/egg mixture spread evenly into the skillet.
4. Cook over medium heat for around 6-7 minutes until firm on the top (you do not want to burn the bottom).  Use a spatula to make sure it is not sticking to the sides.
5. Flip the tortilla.  There are two ways to do this.  Option one: you can take a large plate and place it over the top of the skillet. Make sure the smooth side of the plate is next to the food. Flip the skillet onto the plate. (If it falls apart, you did not cook it long enough.) Then slide it back into the skillet to cook the other side of the tortilla. Option two: you can use another skillet and just flip the tortilla from the pan into the new one.  Make sure that you have sprayed the other pan with cooking spray.
6. Cook for an additional 5-6 minutes.  Remove from heat and serve. Slice with a bread knife or pizza cutter.

Enjoy!


Saturday, March 26, 2022

Panko & Pecan Crusted Mahi Mahi


Panko & Pecan Crusted Mahi Mahi


We have been getting Hello Fresh meal kits since 2020 upon the recommendation of my son. At first, I was not crazy about the idea, but I tried it and really liked it. We started during the pandemic when we were not going out to eat. It provided a much needed diversity to our menu and after long days at work, it was nice to have everything you needed (for the most part) to prep a delicious meal. I also learned a great deal of recipes and new ways to prepare items that really improved my cooking skills. One entree we tried was Pecan-Crusted Trout that I adapted into this recipe. I also changed how I cooked it - opting for an air fryer method. This came out perfectly and it will be a regular addition to our menu planning!

Pictured above with a salad (but you have figured that out already).


Ingredients (Two Servings)

2 tsp Dijon mustard
2 tsp Honey
1 tbsp Mayonnaise (olive oil is preferable)
2 tbsp butter
2-3 tbsp pecans, crushed (may use walnuts or other nuts)
3-4 tbsp Panko bread crumbs
1/2 tsp Thyme (dried)
1/4 tsp Kosher salt
1/4 tsp Black pepper
2 Mahi mahi fillets (or other white fish such as cod).
Cooking spray

Directions
  1. In a small bowl, mix together dijon mustard, honey and mayonnaise. Set aside.
  2. In a microwave safe bowl, melt the butter and let it cool slightly.
  3. Add pecans, panko bread crumbs, thyme, Kosher salt and black pepper to the butter. Mix until well combined.
  4. Pat dry the Mahi mahi fillets with paper towels. Season to taste with Kosher salt and black pepper
  5. Add a thin layer of the mustard mix to each fillet, and coat the top evenly.
  6. Evenly divide the pecan and panko topping and cover each fillet. Press firmly to adhere to the fish.
  7. Preheat the air fryer to 400°.
  8. When it is preheated, spray the tray with cooking spray and place the fillets (carefully) on the cooking tray. Cook for 11-12 minutes.
  9. Remove and let cool slightly before serving.

NOTE: Alternative recipe for the oven - 450° at 10-12 minutes

Enjoy!

Saturday, January 22, 2022

Mediterranean Chicken with Oranges and Olives #AirFryer


Mediterranean Chicken with Oranges and Olives


We are the happy owners of a Gourmia Air Fryer, and had this recipe in the small recipe book that came with the appliance.  (NOTE: for more recipes - visit this page).  We love this addition to our kitchen and think it really does a great job.  I found this recipe for chicken and we decided to give it a whirl.  Tweaked it a bit and loved the way it came out.  I do not have the nutritional information - but there is not much here that is bad for you.  We cooked this with roasted carrots and green beans for a great dinner.  Definitely make this again.  This makes 2-3 servings and does not take too long (outside the marinating time).  

Ingredients (2-3 portions)

1/2 cup Orange juice
2 tbsp Orange zest
1/4 cup White wine (or white cooking wine)
1 tbsp Olive oil
2 tsp (or cloves) Garlic, finely chopped
1 tsp Thyme, dried
1/2 tsp Kosher salt 
1/4 tsp Black pepper
1/4 tsp Fennel seeds
2 Chicken breasts (boneless & skinless) , sliced in half across to make four thinner pieces.
1 tbsp Olive oil
Kosher salt and ground pepper, to taste
1/2 cup Kalamata olives, sliced or chopped
1/4 cup Broth (chicken or vegetable)
Cooking spray

Directions
1. In a large bowl, mix together orange juice, orange zest, white wine, olive oil, garlic, thyme, Kosher salt, black pepper and fennel.  Remove half the marinade and reserve for later.
2. Add chicken to the bowl with the marinade and marinate for around one hour in the refrigerator.
3. After the hour is up, place paper towels on a large plate and pat the chicken dry.
4. Preheat the air fryer to 375 degrees in "Air Fry mode"
5. When preheated, spray the air fryer basket with cooking spray.  Arrange the chicken in a single level and cook for 15 minutes.  
6. While chicken cooks, add reserved marinade, olives and broth a small saucepan.
7. Bring sauce pan to a boil and lower heat to simmer for 10 minutes.  
8. When chicken is done, serve with the sauce.

Enjoy!


Sunday, September 6, 2020

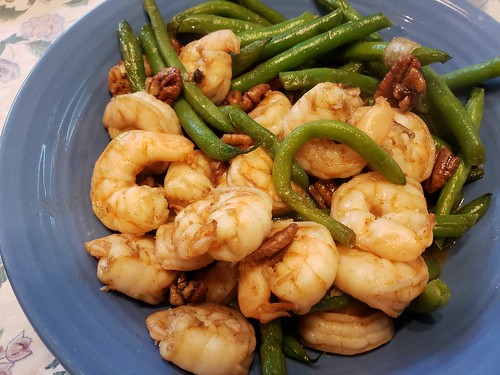
Honey Nut Shrimp with Green Beans

 Honey Nut Shrimp with Green Beans

It seems like I played with this recipe years ago.  But it was only earlier in 2020, so that sounds about right.  I saw this recipe for Honey Walnut Shrimp from EatingWell and played with it.  I liked how it came out and I expect that we will be making it again and again as a simple, but elegant dinner.  This is great served with rice or noddles or just by itself.  If you are serving it with rice, it can feed four.  Without rice, it becomes two nice sized portions (with maybe a bit left over for lunch down the road).

Ingredients (serves 3-4):

2 tbsp Water
2 tbsp Brown sugar
1/2 to 2/3 cup Walnuts or pecans, coarsely chopped
1 lbs Shrimp (large size, peeled and deveined)
1 tsp Honey
1/2 tsp Chinese five-spice blend
1/2 tsp Sesame oil
3 tbsp Olive oil, divided
8 oz Green beans, trimmed
1 tbsp Mayonnaise
1 tbsp Lemon juice
1 tbsp Soy sauce
1/2 tsp Black pepper, ground
1/4 tsp Kosher salt
½ cup sliced scallions

Directions

  1. Bring water and brown sugar to a simmer in a large nonstick skillet over medium heat; cook until the sugar is completely dissolved, about 2-3 minutes. 
  2. Stir in walnuts or pecans; cook, stirring often, until the sugar is golden and caramelized, about 2-3 minutes. 
  3. Spread the walnuts evenly on a parchment paper-lined plate. Wipe out the pan.
  4. Add 1 tbsp Olive oil and heat for a around 30 seconds.  Add the green beans and saute for around 3-4 minutes.  Remove and add to the shrimp mixture. 
  5. Stir shrimp, honey, Chinese five-spice blend, sesame oil, and 1 tablespoon oil together in a bowl. Return the skillet to medium-high heat. Add the shrimp mixture; cook, stirring occasionally, until the shrimp are well browned and cooked through, about 4-5 minutes. Remove from heat. 
  6. In a separate bowl, Combine mayonnaise, lemon juice, soy sauce, pepper, salt and the remaining 1 tablespoon oil in a small bowl and wisk until blended, add to the shrimp mixture in the pan, stirring to coat. 
  7. Sprinkle with the caramelized walnuts and scallions. If desired, serve with rice.

Sunday, August 16, 2020

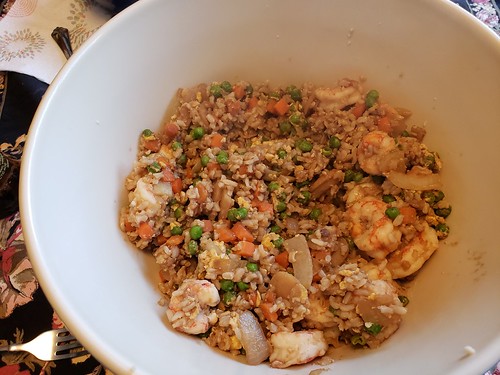
Shrimp and Vegetable Fried Rice

 Shrimp and Vegetable Fried Rice

Every so often you need a dish like this.  It has it all, protein, grains, vegetables, and it is a bit better that you are going to get in a restaurant.  I love brown rice and this is a great way to work that into the diet.  This was adapted from Simply Scratch's recipe for Easy Vegetable Fried Brown Rice with Egg and came out very good.  It also reheated very nicely, so you can enjoy this down the road as leftovers.  I have been thinking that I wanted to make this soon, so I dug through my notes and wanted to get this posted.  I could have used a better picture.  Oh well - at least it tasted good!

Ingredients (3-4 servings)

2 tbsp Canola oil, divided (or light vegetable oil)
1 tsp Sesame oil
1 lbs Shrimp (any size - peeled and deveined)
2 tsp Garlic, chopped (or cloves)
1/2 cup Onion, chopped
8 oz can Water chestnuts, sliced
3 cups Peas and carrots (frozen) - adjust to taste
2 large Eggs
3 cups Rice, cooked (any type will work here)
4 tbsp Soy sauce (low sodium works well here)


Directions

1. Heat 1 tbsp canola oil and sesame oil in a large skillet or wok over medium-high heat. Add shrimp and garlic.  Saute for 3-5 minutes, stirring continually.  Remove when cooked (pink through), remove to a bowl (with any liquids that accumulated).
2. Add remaining 1 tbsp canola oil to the wok.  Add onions and water chestnuts.  Saute for 2 minutes.
3. Add peas and carrots.  Saute for 3-4 minutes.
4. Push the contents of the wok to the side.  Add two eggs and scramble them into the vegetable mixture.  Saute for 2 minutes.
5. Add rice and soy sauce to the wok.  Mix thoroughly and saute for 1-2 minutes.
6. Add shrimp and any collected liquid.  Saute for 1-2 minutes.

Enjoy!

Wednesday, August 12, 2020

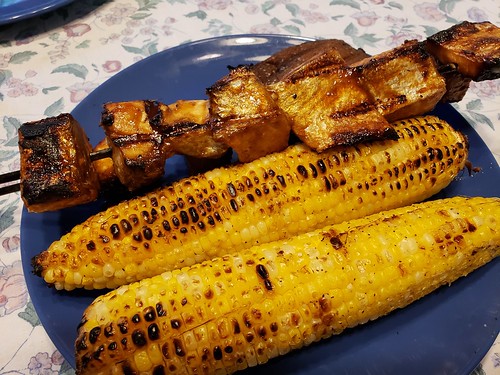
Grilled Salmon Kabobs


Grilled Salmon Kabobs


We wanted to try something different and I think we really hit the jackpot! We have tried cooking Salmon and it is never quite as good as we get when we are out. Since that is not happening that much these days, I wanted to find a recipe that gave us a great restaurant quality way to cook Salmon. This is it! The recipe is from UmmBinat's Soy Glazed Salmon Kabobs that I saw on Food.com. I tweaked the glaze a bit and cooked it with two thick salmon fillets. We will definitely be doing this again and will try with some other firm fish (maybe tuna or swordfish). Adjust the cooking time if the fillets are thin. Ours were around 1" thick at the biggest.

Ingredients (Serves 2)
Two Salmon fillets (with skin), around 3/4 pounds
3 tbsp Brown sugar
2 tbsp Dijon mustard
2 tbsp Soy sauce
2 tsp Rice vinegar

Directions
1. Cut salmon into one inch cubes, trying to keep them as consistent as possible.
2. Thread the salmon onto two metal or wood skewers and place on a plate.
3. In a bowl, combine the brown sugar, Dijon mustard, soy sauce and rice vinegar to make the glaze.  Wisk until well blended.  
4. Brush the glaze over the fish, reserving a small amount.
5. Grill or broil over high heat for 7-9 minutes, turning them at the mid-way point.  Use the reserved glaze to brush the fish after it is turned.  Fish should flake easily with a fork when done.

Enjoy!  


Saturday, April 11, 2020

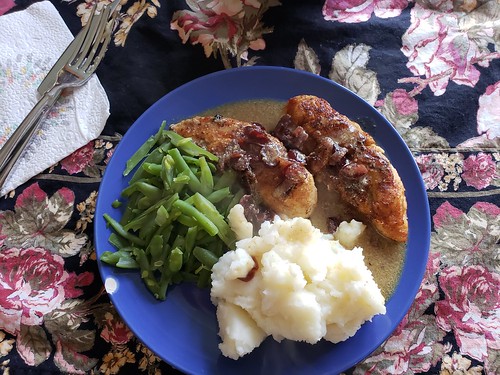
Chicken with Cranberry Mustard Sauce


Chicken with Cranberry Mustard Sauce

The other day, I was looking for a cookie recipe and I stumbled upon the Ocean Spray recipe page.  I have grown very fond of cranberries and want to use them in more recipes.  I found this great recipe for Chicken Tenderloins with Cranberry Mustard Sauce and it looked excellent.  I played with it and tried it tonight.  Loved the way it turned out.  We made mashed potatoes and green beans to go with this.  This will be on a steady rotation - it was fantastic - and it is pretty healthy to make it even better.  We will have this again, maybe with roasted veggies.

Ingredients (Serves 2)

4-6 pieces Chicken tenderloins (or two chicken breasts cut into strips)
1-2 tbsp Flour
1/4 tsp Kosher Salt (adjust to taste)
1/4 tsp Black pepper (adjust to taste)
1 tbsp Butter
2 tbsp Olive oil
1/3 cup White cooking wine (or white wine)
2/3 cup Chicken broth
3 tbsp Dijon or brown mustard
1 tsp Cornstarch
1 tbsp Water
1/4 cup Dried Cranberries (adjust to taste)

Directions
  1. Lightly toss chicken pieces with flour; shake off excess. Sprinkle lightly with Kosher salt and black pepper.
  2. Heat the butter and olive oil over medium-high heat in a large skillet. Add the chicken and cook 3-4 per side, until chicken is golden brown on each side and cooked through. Remove from pan and keep under foil to keep warm.
  3. Add cooking wine, chicken broth and mustard to skillet, scraping up browned bits and cook for around 1 minute.
  4. Combine cornstarch and water in a small bowl. Stir into skillet with the dried cranberries and bring to a boil.  Cook for 2-3 minutes. Boil 1 to 2 minutes or until sauce thickens. 
Pour sauce over chicken & enjoy!

Sunday, September 15, 2019

Basic Roasted Chicken Breast


Basic Roasted Chicken Breast

Here is a very basic way to cook chicken breast. We have been cutting these thinly to add to salads and use for sandwiches. Not gonna lie - we were inspired by our love of salads at Panera! This is a simple recipe, but one I want to record so I can keep going back to it.

Ingredients (for 3 chicken breasts)
3 Chicken breasts (skinless and fat trimmed)
1 tbsp Olive oil
1/2 tsp Kosher salt
1/2 tsp Black pepper
1/2 tsp Paprika
Olive oil spray or cooking spray

Directions
1. Preheat oven to 400°.
2. Place the chicken in a mixing bowl.  Add olive oil, Kosher salt, black pepper and paprika.  Mix to coat the chicken.
3. Spray the bottom of a cooking dish with olive oil spray.
4. Bake for 26-28 minutes (more for larger breasts) until a meat thermometer registers 165°.

Enjoy!  If you are using it for salads, let cool before slicing.

NOTE: For very large chicken breasts, cut in half and cook for 35-40 minutes.  Use the meat thermometer to be sure it is cooked through.

Easy Shrimp Boil


Easy Shrimp Boil

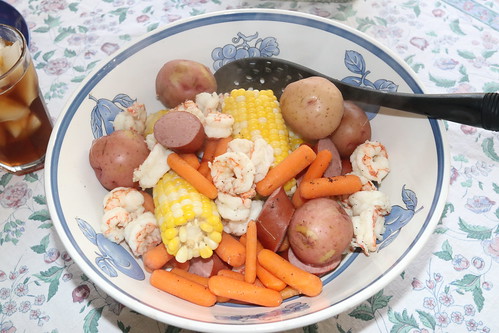
I have longed for going back to Door County, Wisconsin, where I could get a classic fish boil.  I have not had one of those in almost 30 years, but it seems like something that I have to get on.  So when I saw a recipe for a Weeknight Ship Boil from Eating Well, I thought that this was something I had to try.  I played with it a bit and really liked the way it came out.  I think I will be making this again in the near future!

Ingredients (Serves 3-4)
5 quarts Water
1/3 cup Seasoning mix (Morton's Nature's Seasons or McCormick's Old Bay)
1 tsp Celery seed
4 tbsp Lemon juice
8-10 Baby red skinned potatoes
1 cup Carrots (baby cut or sliced into one inch pieces)
1 lbs Shrimp, peeled & raw (21-25 per pound)
5-7 oz Chicken or turkey cooked sausage (kielbasa or andouille works well), cut into 1-inch pieces
2 Ears corn, husked and broken in half
Melted butter for serving (optional)

Directions
1. Combine water, seasoning mix, celery seed, and lemon juice in a large pot. Bring to a boil. Add potatoes and cook for 15 minutes.
2. Add carrots and cook an additional 10 minutes.
3. Add shrimp, sausage, and corn to the pot and cook (stirring occasionally) for around 6-7 minutes.
4. Using a slotted spoon and tongs, divide the shrimp, sausage and vegetables among the 3 or 4 serving bowls. Drizzle each portion with around 2 tablespoons of the cooking liquid.

Enjoy!  Serve with butter, if desired.

Wednesday, January 30, 2019

One-Pan Petite Meatloaf With Roasted Veggies


One-Pan Petite Meatloaf With Roasted Veggies Dinner

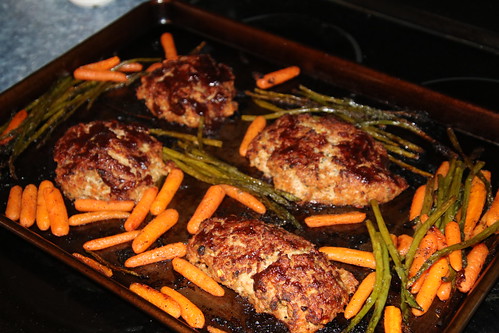
We made this last fall and it was really great. Just catching up and getting my recipes loaded. This one was adapted from a great recipe from Cooking Light from Gina Homolka, the founder of skinnytaste.com @skinnytaste. I am a big fan of sheet pan dinners - so it was worth a try. I loved how this came out and it is a great way to make a hearty meal, even after a long day at work. Most of the ingredients can be purchased in advanced, and the veggies can be traded in and out as they are available.

Ingredients (Makes 4 servings)

Olive oil cooking spray
1 lbs Ground turkey (93% lean)
1/2 cup Old fashioned oats
6 tbsp Ketchup, divided
2 tbsp Minced onions (dried)
1 tbsp Parsley (dried)
1 large Egg
1 tsp Marjoram (dried)
1 tsp Kosher salt, divided
1 tbsp Worcestershire sauce
One bunch asparagus, trimmed and thin (or green beans)
8-10 oz Baby carrots, with larger ones cut in half
2 tbsp Olive oil
1/4 tsp Black pepper

Directions

  1. Preheat oven to 450°F. 
  2. Coat a large rimmed baking sheet with cooking spray. 
  3. Combine turkey, oats, 4 tablespoons ketchup, dried onion, dried parsley, egg, marjoram, and 1/2 teaspoon Kosher salt in a medium bowl. 
  4. Divide into 4 (4- x 2 1/2-inch) loaves; place, evenly spaced, on pan. Combine Worcestershire sauce and remaining 2 tablespoons ketchup in a small bowl; brush over loaves. 
  5. Combine asparagus, carrots, olive oil, black pepper, and remaining 1/2 teaspoon Kosher salt in a large bowl. Scatter vegetables around loaves. 
  6. Bake at 450°F for 20 minutes. Stir vegetables and continue to bake until loaves are no longer pink in the center, 10-12 more minutes.
Enjoy!

Sunday, July 9, 2017

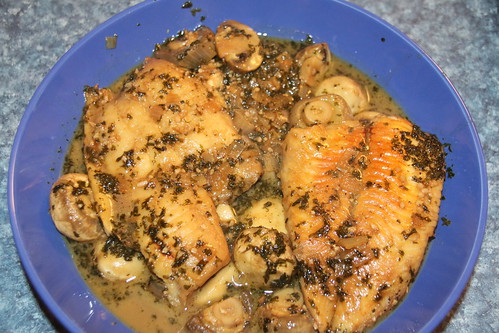
Flounder and Sauteed Mushrooms


Flounder and Sauteed Mushrooms

This is a new dish that I developed from a variation of one of our favorites, sauteed mushrooms (as inspired by Agostino's Ristorante Italiano (or Agostino's By The Sea) in Capistrano Beach, California.  We want to eat more fish, and it dawned on me that this was a good way to do it.  The fish came out very tender and flavorful.  I believe that you can use virtually white fish here, say tilapia or whitefish (you may want to adjust the cooking time for thickness).  We had flounder.  Even though it was a bit freezer burned - but it came out great!  As a kid growing up in New Jersey, flounder was our everyday fish.  Things are definitely not that way in the Midwest.

I do not have the calories figured out - or even estimated, but I have to figure this is a pretty good meal for a low-calorie dining plan.  While you can serve this beautifully with a baguette, having a green vegetable to go with this would also be great.  It is a very nice way to prepare fish that is very different that what we normally do at home.  And it came out great.

Ingredients (serves 2)
2 tbsp Olive oil
1 tbsp Butter
2 oz can Anchovies (with most of the oil drained)
2 cloves (or tsp) Chopped garlic
1 Shallot (small), chopped
1 tbsp Parsley, dried
1/2 tsp Kosher salt (adjust to taste)
1/4 tsp Black pepper (adjust to taste)
16 oz White mushrooms, stems trimmed and larger ones halved
1/2 cup Chicken or vegetable broth
1/2 cup Sherry or cooking sherry
2 Flounder fillets (or other thinner white fish such as haddock or tilapia)

Directions
1. Heat oil and butter over medium-high heat for 1-2 minutes (or until the butter is melted).
2. Add anchovies, garlic, shallot, parsley Kosher salt and black pepper.  Saute for 2-3 minutes, breaking up the anchovies.
3. Add mushrooms and saute until they are blended with the anchovies-garlic mixture.
4. Add the broth and sherry.  Saute for 5-7 minutes.
5. Using a slotted spoon, remove the mushrooms from the pan (leaving as much liquid as possible in the pan).  Put a piece of foil over the mushrooms to keep warm in a serving bowl.
6. Place the flounder in the pan.  Cover and cook for 5-6 minutes.
7. Lower the heat to medium and add the mushrooms back to the pan.  Cook uncovered for around 2-3 minutes.

Enjoy!

Sunday, May 7, 2017

Corey's Sheet-Pan Chicken Fajitas


Corey's Sheet-Pan Chicken Fajitas

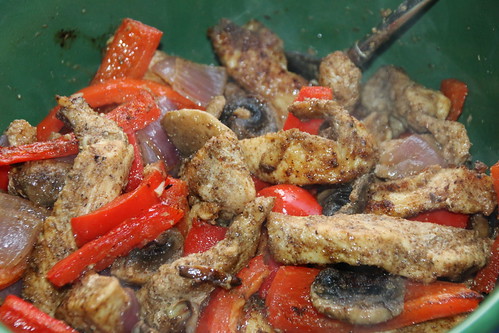
As family lore goes, the very first meal I made my wife while we were still dating was steak fajitas.  Well, to put it more to the point, it was an attempt at making steak fajitas - a very poor attempt. (Cooking note - beef stew pieces do not belong in a fajita...ever).  Luckily for me, she did not break up with me on the spot.  Needless to say, I have gotten much better in the nearly 30 years since the steak fajita incident.  Which brings me to this new recipe for sheet-pan chicken fajitas.  I found this recipe on the excellent Eating Well site and adapted it to make it a bit less spicy and more to our tastes.  I love Mexican food and this recipe recently made it into the magazine.  And wow - this just came out fantastic.  This will be a new favorite for sure.  I think this would be great with either tortillas or over rice.  This will get into the regular rotation for sure.  And you make it all in a sheet-pan, so cleanup is a breeze!

Ingredients (serves 3-4)

Cooking spray
2 Red bell pepper, sliced (use any color)
8 oz Mushrooms, stems removed and sliced to 1/4" thickness
1 - 1 1/2 cups Red onion, chopped into 1/2" pieces
1 pound Chicken breast (boneless and skinless)
2 tbsp Olive oil
2 tsp Chili powder
2 tsp Cumin, ground
1 tsp Garlic powder
1 tsp Onion powder
1 tsp Kosher salt
1/2 tsp Black pepper
1 tbsp Lime juice
8 Tortillas (if desired)

Directions

1. Preheat oven to 400°F. Coat a large rimmed baking sheet with cooking spray.
2. Place the cut bell peppers, mushrooms, and onions in a large mixing bowl.
3. Cut chicken breasts in half horizontally, then slice crosswise into thin strips. Then place the chicken on top of the vegetables.
4. Add olive oil, chili powder, cumin, garlic powder, onion powder, Kosher salt and black pepper to the mixing bowl.  Blend thoroughly and spread in an even layer on the rimmed baking sheet.
5. Roast on the middle rack for 16-18 minutes. Leave the pan there and turn the broiler to high. Broil for an additional 6-7 minutes.
6. Remove from oven and use a slotted spoon to move fajitas to a serving bowl. Stir in lime juice.

Enjoy with tortillas or over rice!

Tuesday, February 7, 2017

Mexican Chicken and Rice


Mexican Chicken and Rice

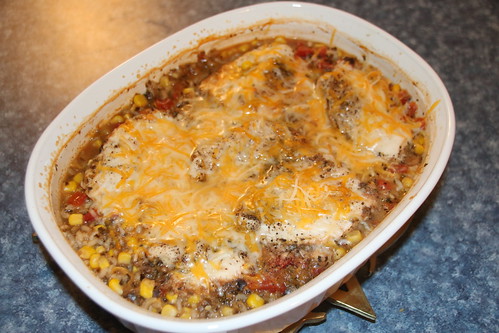
So I stumbled across a recipe that I wanted to try.  I love coming up with recipes that can take advantage of things that you might already have in your pantry and your freezer - and I think this is a good option!  I found on food.com a recipe for Spanish Chicken & Rice Bake.  I made a few tweaks to see if I can make it more pantry friendly.  It was super easy to prepare and very tasty.  The chicken came out fantastic!  We will definitely make this again.

Ingredients (Serves 3-4)

1 can Cream of chicken soup (10.5 oz)
1 can Petite diced tomatoes (14.5 oz), with liquid
1 cup Chicken (or vegetable) broth
1 can Whole kernel corn (15 oz) , drained
1 can Chopped black olives (4.25 oz)
3/4 cup Long-grain white rice, uncooked
1/2 tsp Cumin
1/2 tsp Oregano
1/4 tsp Garlic powder
3 Chicken breast halves (boneless and cut in half)
1/2 tsp Kosher salt
1/4 tsp Black pepper
1/4 tsp Chili powder (adjust to taste)
1/4 cup Shredded cheddar cheese (adjust to taste)

Directions

1. Preheat oven to 375°F
2. In a casserole dish (with a cover), mix cream of chicken soup, tomatoes, chicken broth, corn, black olives, rice, cumin, oregano and garlic powder.
3. Top soup mixture with chicken.  Season with Kosher salt, black pepper and chili powder.
4. Cover tightly with casserole lid or foil.  Bake at 375°F for 50-55 minutes.
5. Sprinkle with cheese over the chicken, cover with lid and let set for 2-3 minutes.

Enjoy!

Monday, January 16, 2017

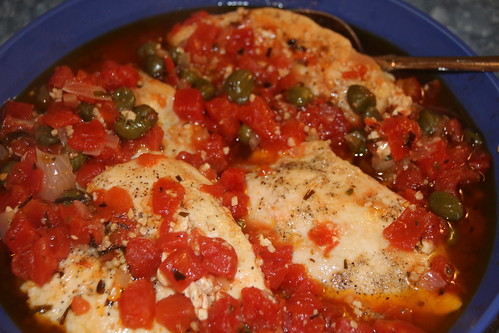
Mediterranean Chicken With Tomatoes and Capers


Mediterranean Chicken With Tomatoes and Capers

One of my favorite recipe sites is the wonderful Cooking with the New York Times.  I have seen their recipe for a while for Chicken Breasts With Tomatoes and Capers and have wanted to make this.  This just looked like a great and healthy option when you are looking for something great to cook in a hurry.  The best part is that you can make most of this with freezer and pantry staples, so it can come together quickly and without a ton of prep. It is also very easy to pull together.  The chicken comes out super moist (and tasty).

Ingredients (serves 4)

4 Chicken breasts (boneless & skinless)
1/2 tsp Kosher salt (adjust to taste)
1/4 tsp Black pepper (adjust to taste)
2 tbsp Olive oil
2 tbsp Butter
1 Shallot, finely chopped
3 tsp Garlic, finely chopped
1 tsp Tarragon, dried
1 tsp Oregano, dried
14.5 oz can Petite diced tomatoes
1/4 cup Red wine vinegar
1/4 cup Capers, drained
1 cup Dry white wine (or cooking wine)
1 tbsp Tomato paste

Directions

1. Sprinkle chicken with Kosher salt and black pepper.
2. Heat the olive oil and butter in a large skillet. Add the chicken breasts and saute over medium-high heat, turning the pieces after 4 minutes and cook for another 3 minutes.
3. Add the shallots and garlic to the pan and cook for an additional minute.
4. Add tarragon, oregano, tomatoes (with liquid), vinegar, capers, wine and tomato paste. Bring to a boil as you stir to dissolve the brown particles on the bottom of the skillet.
5. Cover and lower to medium.  Simmer for 9-11 minutes.

Enjoy with rice!

Sunday, January 15, 2017

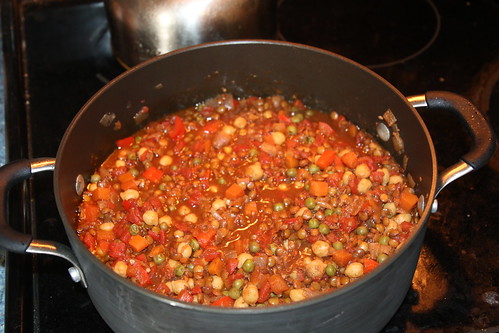
Pilgrim Chili


Pilgrim Chili

This is a recipe I made a few months ago and have been carrying around for a long time! I wanted to make a quick vegetarian stew and loved the way this turned out. This recipe was adapted from the Pulse Pledge's Northwest Chili. This is a cool site that promotes eating pulses (things like chickpeas, lentils, peas & beans).  I loved this as a lunch meal, especially since it reheats great in the microwave.  You can also add hot sauce if you want more of a bite!  And about the name - I have no idea why I called it that.  I first made it in July, so it was not even near Thanksgiving!  However, it might be a nice dish to have for vegetarian diners on that holiday.

Ingredients (4-6 servings)

2 tbsp Olive oil
2 small Onions, chopped (or one medium)
3 tsp Garlic, minced (or cloves)
1 Bell pepper (red or green), chopped
1 1/4 cup  Lentils (dry), rinsed
2 cups Peas and carrots (frozen)
1  tbsp Chili powder
2 tsp Cumin
2 tsp Cinnamon
1 tsp Kosher salt
1/2 tsp Black pepper
2 1/2 cups Broth (Vegetable or Chicken)
28 oz can Tomatoes (petite diced), drain much of the liquid (but not all)
15 oz can Chickpeas (garbanzo beans), drained

Instructions

1. In a large pot, heat the oil over medium-high heat.  Add the onion, garlic & bell pepper and saute for 3-5  minutes. Add lentils, and stir to coat them with oil.
2. Add frozen peas and carrots, chili powder, cumin, cinnamon, Kosher salt, black pepper, and broth.  Bring to a boil. Reduce heat, cover, and simmer about 25-30 minutes.
3. Add tomatoes and chickpeas.  Mix thoroughly and simmer for another 15 minutes.

Enjoy!

Saturday, December 31, 2016

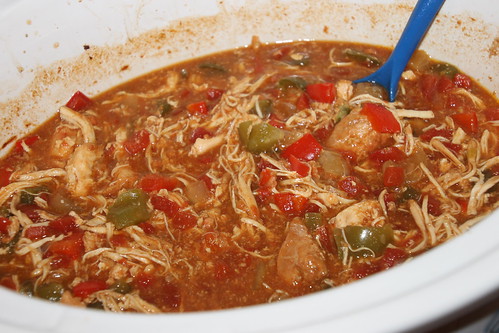
Stewed Mexican Chicken


Stewed Mexican Chicken


Stewed Mexican Chicken

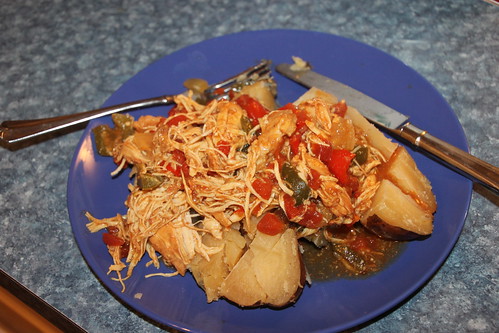
Over ten years ago, I shared a recipe for Chicken Taco Filling that is super easy to make in the slow cooker.  Last year, in conjunction with the slow cooker baked potatoes, I tried a new variation on this to have a heartier version of this dish.  I loved how it came together and worked with the baked potato.  This would also be great over rice or as a quesadilla filling.

Ingredients (makes 5-7 portions):
2 tbsp Dried minced onions
2 1/2 lbs Frozen boneless and skinless chicken breasts
1 Red pepper, diced
1 Green pepper, diced
2 Yellow onions (small), diced (or one medium)
2 packages Taco seasoning mix (low sodium if you have it) - (1.25 oz)
28oz can Petite diced tomatoes (with added flavors if you like), undrained
1 cup Broth (chicken or vegetable)

Directions

1. Place dried minced onions, frozen chicken, red peppers, green peppers and onion in the slow cooker (in that order).
2. Sprinkle the taco mix on top and then add the petite diced tomatoes (with liquid) and broth.  Try to cover all the taco mix.
3. Cook on low for 8-10 hours.
4. When done, take two forks and shred the chicken and mix into the sauce. You can let it cook for an additional half our or so (but it is not necessary).

Enjoy - especially on a baked potato!

Tuesday, December 27, 2016

Christmas Quiche


Christmas Quiche

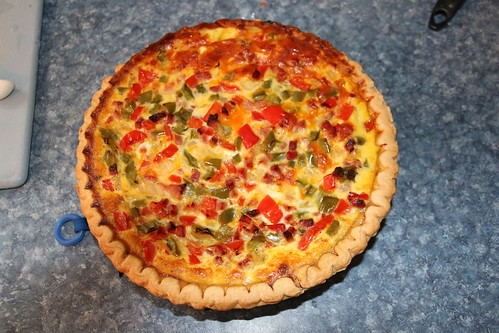
If you have a bunch that you need to bring a dish to - I think I have a good suggestion!  I adapted this recipe from my Spinach and Mushroom Quiche that I have been making for a while.  We wanted something else for a holiday gathering and with Jeremy's help, we came up with this new quiche.  It was going to be called a Western Quiche based on the fact that it was similar to a Western Omelette.  But in the end, I think I will call it as Christmas Quiche, because it has green and red peppers.  This naming comes from Mexican cooking (I think) as it has both red and green peppers in it.  Regardless of how it is named, it is really nice to have another quiche to cook.  This is great for brunch or any meal and we will definitely make it again.

Ingredients (serves 4-5)
1 Frozen deep dish pie crust
2 tbsp Olive oil
1 cup Green pepper, diced
1 cup Red pepper, diced
1 small Yellow onion, diced
8 oz Ham, diced
1 1/4 cup Skim milk
6 Large eggs
1 1/4 cups Cheddar cheese, shredded
1/4 tsp Black pepper
1/2 tsp Kosher salt

Directions
1. Bake pie crust per directions.  Then change the temperature to 400°F for the quiche.
2. In non-stick skillet over medium-high heat, add 2 tablespoon olive oil and cook peppers and onions for around 5 minutes.  Add ham to saute pan and cook an additional 4-5 minutes. Remove from heat.
3. In a large bowl, add ham mixture with skim milk, eggs, cheese, black pepper and salt until well blended.
4. Place the pie crust on a Jelly Roll pan.  Pour vegetable mixture into deep dish pie crust.  Bake quiche 45-50 minutes until filling and crust are golden and knife inserted in center comes out clean.  Let sit 5 minutes and then serve.

Enjoy!

Sunday, July 3, 2016

Noodles with Tofu and Black Bean Sauce


Noodles with Tofu and Black Bean Sauce

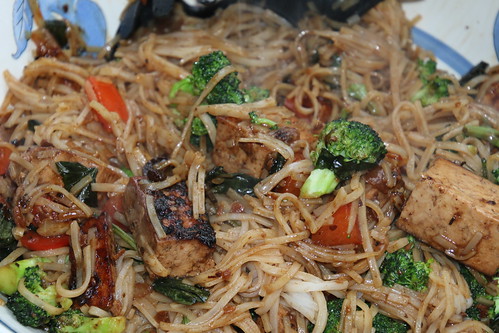
I wanted to try some Asian cooking with black bean sauce.  Before you tell me I need to make the black bean sauce from scratch, I will get to that someday.  In the meanwhile, I wanted to make a dish with noddles and tofu with black bean sauce.  I tweaked the recipe that I called Thai Sober Noodles for this dish and I think it came out great.  I hope that I will play with this in the future.  I loved the way it came out and the way it reheated for lunches.

Ingredients (serves 4)

4 tbsp Soy sauce, divided
2 tbsp Rice wine vinegar
1/2 tsp Sesame oil
1/2 tsp Chinese five spice
2 tsp Garlic, chopped (or 2 cloves)
1 tsp Ginger, minced
16oz Tofu (extra-firm), drained and cut into 1 inch cubes
8oz Rice Noodles (large size - though it is not that critical)
1 tbsp Olive oil
3 tbsp Canola oil
1 Yellow onion, diced
1 Red bell pepper, diced
2 Crowns broccoli, trimmed into florets
1 bunch Basil, cut into strips (around a 1/2 cup)
3 tbsp Black bean sauce
1/2 cup Vegetable or chicken broth

Directions

1. In a small bowl, mix 2 tbsp soy sauce, rice wine vinegar, sesame oil, Chinese five spice, garlic and ginger.  Add the drained and cut tofu.  Marinate for 15 minutes.
2. Bring a pot of water to boil. Add rice noodles and submerge in the boiling water. Remove from heat and add 1 tbsp of olive oil. After 10 minutes, drain.
3. Add 1 tbsp canola oil to a non-stick wok or large saute pan over high heat.  Add tofu with marinade to the wok and cook for around 5 minutes.  Stir occasionally.  Remove from pan and keep warm under foil.
4. Lower heat to medium-high and add 1 tbsp canola oil.  Add onion and bell pepper.  Stir-fry for 2 minutes.
5. Add 1 tbsp canola oil and broccoli.  Cook for 3-4 minutes.
6. Add basil and black bean sauce.  Cook for 1 minute.
7. Add the broth and the cooked noodles to the pan.  Cook for 1-2 minutes.
8. Return the cooked tofu to the pan and mix thoroughly.  Once mixed, remove from heat.

Enjoy!

Sunday, April 24, 2016

Chicken Scaloppine with Roasted Vegetables


Chicken Scaloppine with Roasted Vegetables

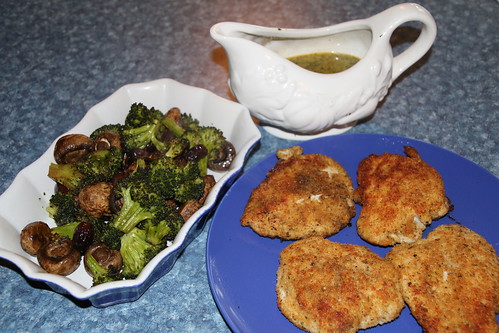
I found a great recipe from Cooking Light for Chicken Scaloppine over Broccoli Rabe. I waned to play with this a bit to add more veggies and create a dish that would not need a starch as a side. I think that we really came up with something really good here. The chicken tasted fantastic and I love the roasted broccoli and mushrooms. It was very filling.  Furthermore, it reheated beautifully for lunch the following day.  I think this is going to be a regular at our house.

Ingredients (serves 2-3)
3 tbsp Olive oil, divided
2 Broccoli crowns, trimmed to florets
12 oz Mushrooms, stems trimmed
20-24 Kalamata olives, pitted
1/2 tsp Kosher salt
1/2 tsp Oregano
1/2 tsp Black pepper, divided
1/3 cup Italian-seasoned breadcrumbs
2 (6-ounce) skinless, boneless chicken breast cutlets, cut in half and pounded thin (around 1/4")
1/4 cup Dry white wine or cooking white wine
1/4 cup Chicken broth
1 tbsp Lemon juice
1 tbsp Butter
2 tsp Parsley, dried
1 tbsp Capers, rinsed and drained

Directions
  1. Heat oven to 400 degrees.
  2. In a large bowl, add 2 tbsp olive oil, broccoli florets, mushrooms, olives, kosher salt, oregano and 1/4 tsp black pepper.  Mix gently until the vegetables are coated with oil.  Place vegetable mixture in a jelly roll pan or a baking pan with a lip.  
  3. Roast in oven for 24-26 minutes, stirring half-way through.
  4. Meanwhile, combine breadcrumbs and remaining 1/4 tsp pepper in a shallow dish; dredge chicken in breadcrumb mixture.
  5. Around the halfway mark of the roasted vegetables, heat the remaining tbsp of olive oil over medium-high heat.  
  6. Add chicken to pan; cook 3 minutes on each side or until done. Remove from pan; keep warm under foil.
  7. In the same pan, add wine, broth, lemon juice, butter, dried parsley and capers.  Lower heat to medium and scrape the pan to loosen browned bits. Cook for 3 minutes until it creates a nice sauce.  
Enjoy chicken with roasted vegetables with sauce on each portion.